
This chapter walks you through getting a physical device online and into the app.
There's only one entry point: open a tank's detail page → top-right menu (⋮) → "Add device". Devices added this way go straight into that tank.
💡 So you need a tank first before adding a device. No tank yet? Create one in Getting Started.
Pick the right method first
After tapping "Add device" you land on the scan screen, with two paths:
Method | Best for | Notes |
|---|---|---|
A · Scan to pair | Device has a QR code (most common for new devices) | Easiest — one scan, mostly automatic |
B · Add manually | No QR code, or scanning won't cooperate | Tap "Add manually" on the scan screen and pick the device from the Bluetooth list |
Not sure? Try method A (scan) first.
Put the device into "pairing mode"
Either way, the device must enter pairing mode first before the app can find and connect to it.
- The usual way: long-press the device's function button for about 15 seconds, until the indicator starts blinking — blinking usually means it's in pairing mode.
- Button position and indicator color vary by device; follow the device's own instructions.
⚠️ Order matters: it's best to open the pairing/scan screen in the app first, then long-press the device. After entering pairing mode the device only waits a while; wake it too early and it may time out before you've opened the app — then you have to long-press again.
Method A: scan to pair
- On the scan screen, line up the QR code on the device packaging with the viewfinder; the app recognizes it automatically.
- Once recognized, the next few steps are automatic — just hold the phone steady and keep the device in pairing mode. The screen steps through: QR recognized → checking Bluetooth & permissions → searching for nearby devices (shows "N devices found") → connecting → secure handshake → verifying QR code → verified, entering Wi-Fi setup.
- After this the app jumps to the Wi-Fi setup screen (see "Filling in the Wi-Fi setup screen" below).
💡 Won't scan? Try getting closer, changing the angle, or better lighting. Codes on curved packaging are especially tricky. If it still won't work, tap "No QR code? Try adding manually" to switch to method B.
Method B: add manually
For when there's no QR code, or scanning won't cooperate.
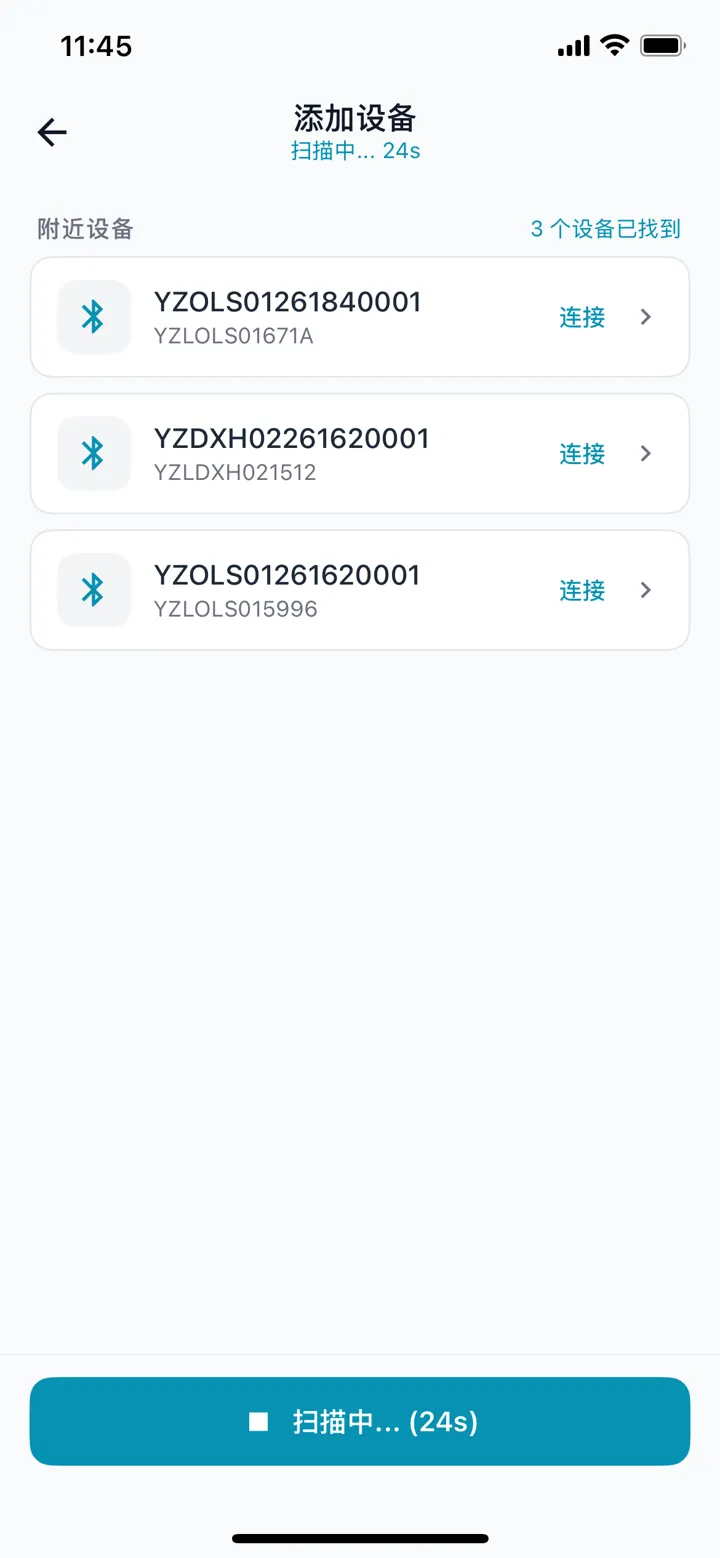
- On the manual-add screen the app scans for nearby Bluetooth devices and lists what it finds (icon, name/SN, and device model).
- Match against the SN sticker on the device body, tap yours in the list, and tap "Connect".
- You then reach the same Wi-Fi setup screen; enter the activation code from the packaging if needed.
💡 Nothing in the list? Check: is the device powered on, is it in pairing mode (indicator blinking?), is the phone's Bluetooth on, and are you close enough?
Filling in the Wi-Fi setup screen
This is the key screen that actually puts the device on your home network:
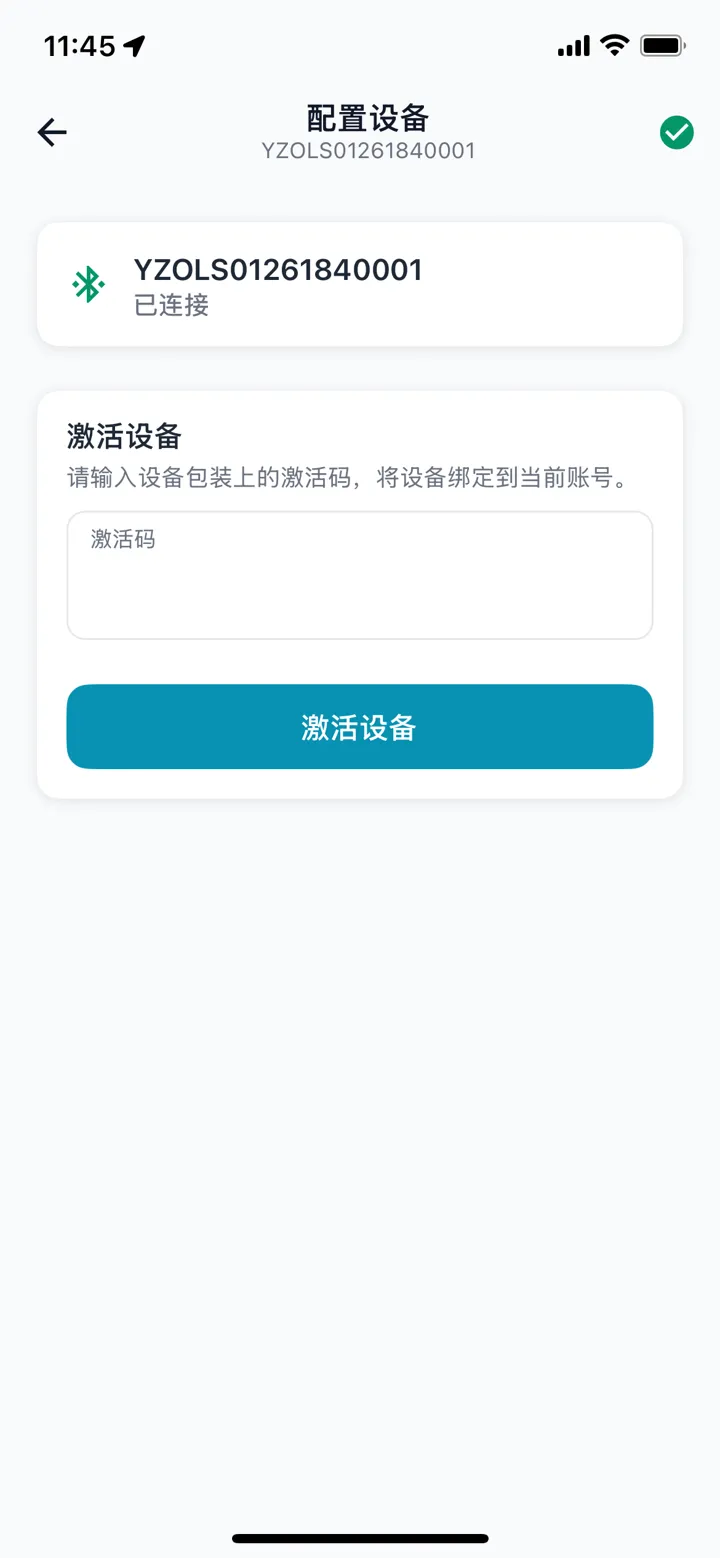
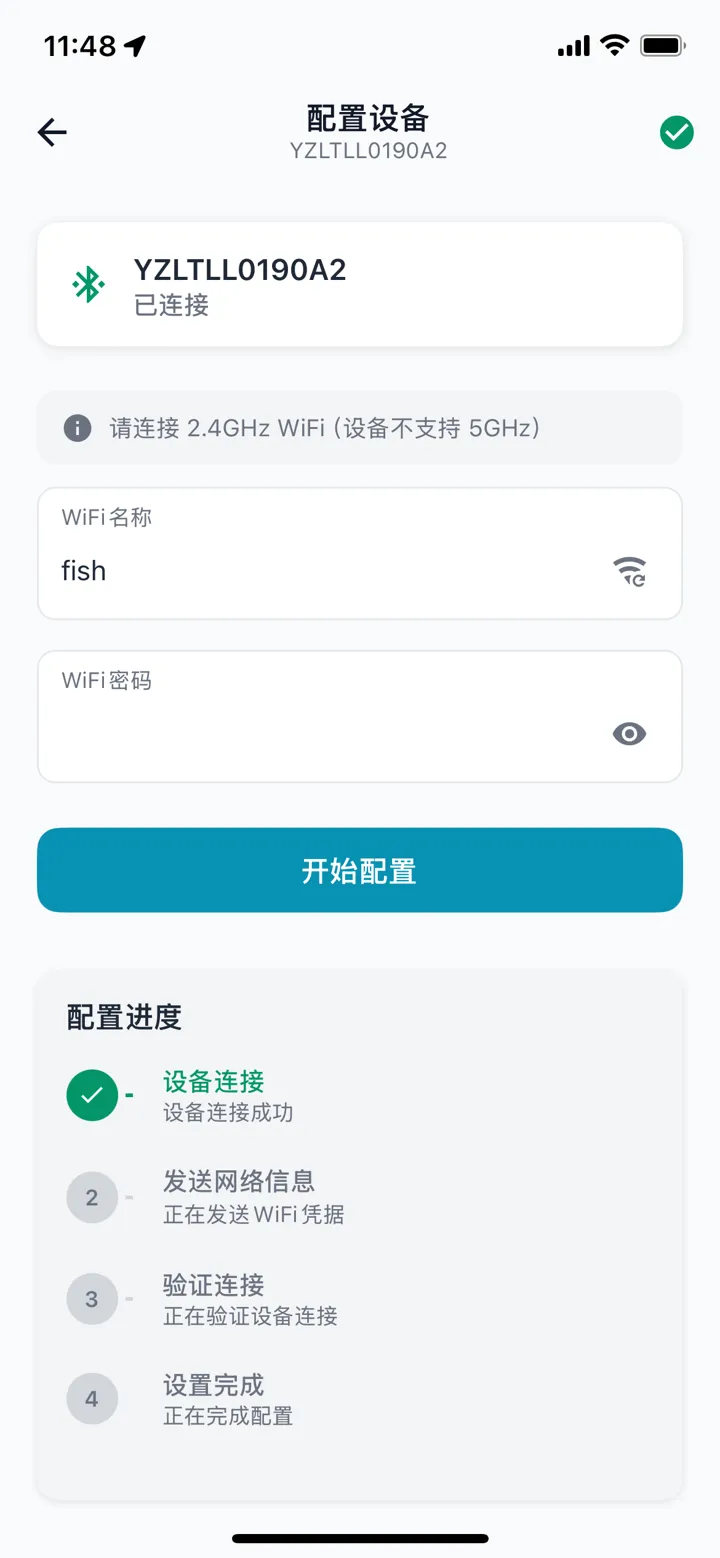
- Activation code: new devices need the code from the packaging (scanning usually fills it in automatically). A device that was paired before and is just being re-paired generally doesn't need it.
- Wi-Fi name: the app auto-fills the Wi-Fi your phone is currently on. Tap refresh on the right to have the device scan nearby networks and pick from the list.
- Wi-Fi password: type your home Wi-Fi password.
- Bottom status: "Device connected" means the Bluetooth channel is ready and you can tap "Connect" to send.
Then tap "Connect / Start setup".
⚠️ About 2.4GHz: if the app warns "This Wi-Fi may be 5GHz, which the device doesn't support", the network you picked won't connect. Tap refresh and manually pick a 2.4GHz network from the list.
Reading the pairing progress (four steps)
After you tap Connect, a four-step progress bar appears so you know what each stage is doing and where things stand if it stalls:
- Device connect — the phone is establishing a Bluetooth channel with the device.
- Send network info — sending the Wi-Fi name and password to the device.
- Verify connection — the device uses the Wi-Fi to go online and report to the cloud; the app waits for it. This step takes longest — tens of seconds to a couple of minutes.
- Setup complete — all done.
💡 If step ③ spins for a while, don't rush to quit. It's slow on weak networks; the app offers "Keep waiting" to give it more time.
What success and failure look like
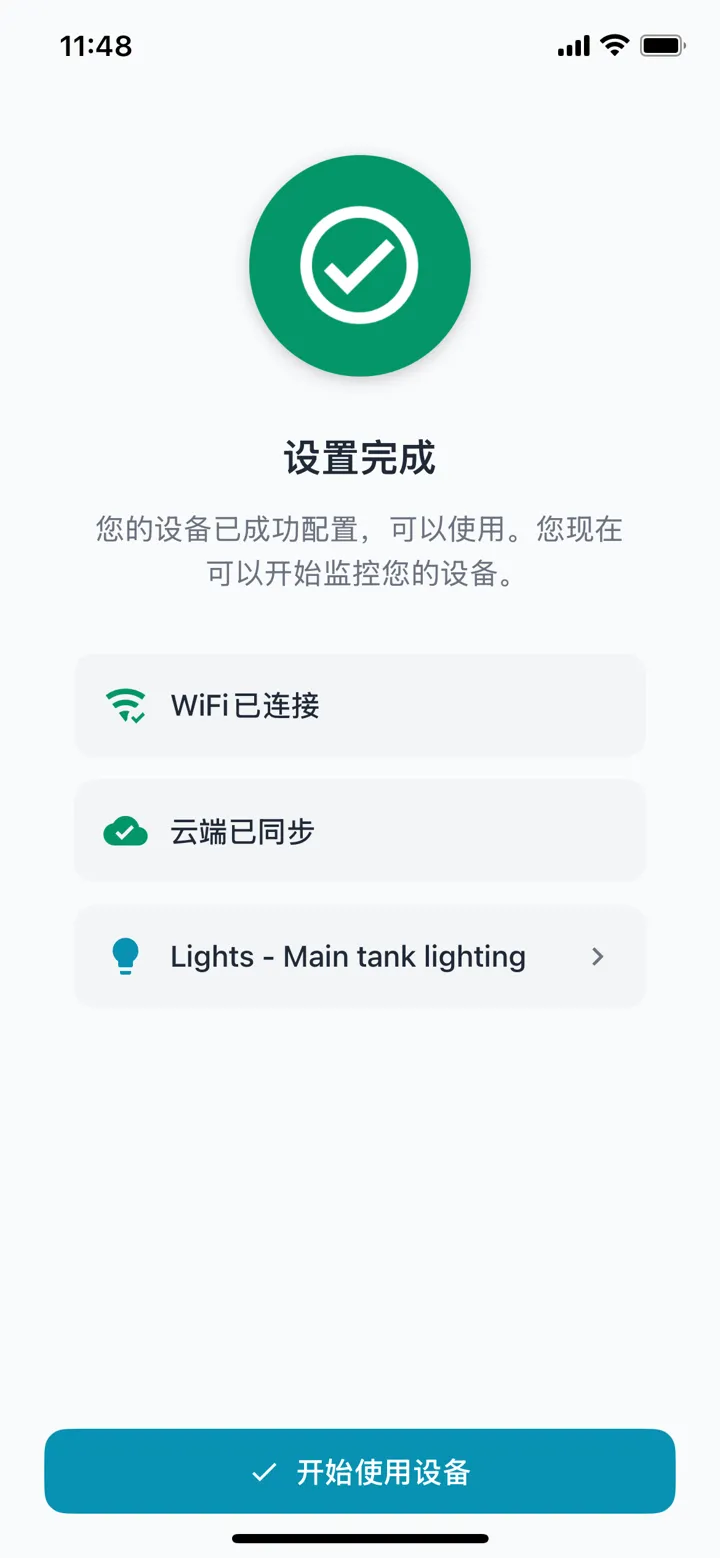
Success: you see a "Setup successful" result page saying the device is ready. From here you can usually bind it to a tank role right away (see "Binding a device to a tank" below), or Skip and bind later from the device detail.
Failure: you get an error with a direction to investigate. The most common:
Message | Meaning | What to do |
|---|---|---|
Network setup failed, please retry | Bluetooth transfer interrupted or wrong password | Check the Wi-Fi password, keep the device close, and retry |
Device already bound | The device is still bound to another account | Unbind it on the original account first, or contact the seller |
Device online timeout | The device didn't reach the cloud in time | Tap "Keep waiting", or check that the Wi-Fi is 2.4GHz and the password is right |
Too many activation attempts | Rate-limited after too many tries | Wait a bit and try again |
For deeper troubleshooting see Troubleshooting.
Binding a device to a tank
First, a simple idea: a device is a physical thing (a light, a pump); a tank is a scene (that tank in the living room). "Binding" tells the app which device provides this tank's "Main light" — so when you tap "turn on the light" in the tank, it knows which one to switch.
There are two entry points, with the same result:
① Bind right after pairing — the pairing result page lets you pick a role for the new device (main light, water temperature, water level…); pick one to bind.
② Bind from the tank detail — open the tank detail page, find a role/function (e.g. "Main light", "Water temperature sensor", "pH"); if no device is bound it shows "Not bound": tap "Bind device" → pick one of the suggested available devices → confirm, and it shows "Bound".
To swap devices tap "Change device"; to remove, choose "Remove" / "Unbind" in the device menu (after unbinding, the device must be re-paired before it can be used again).
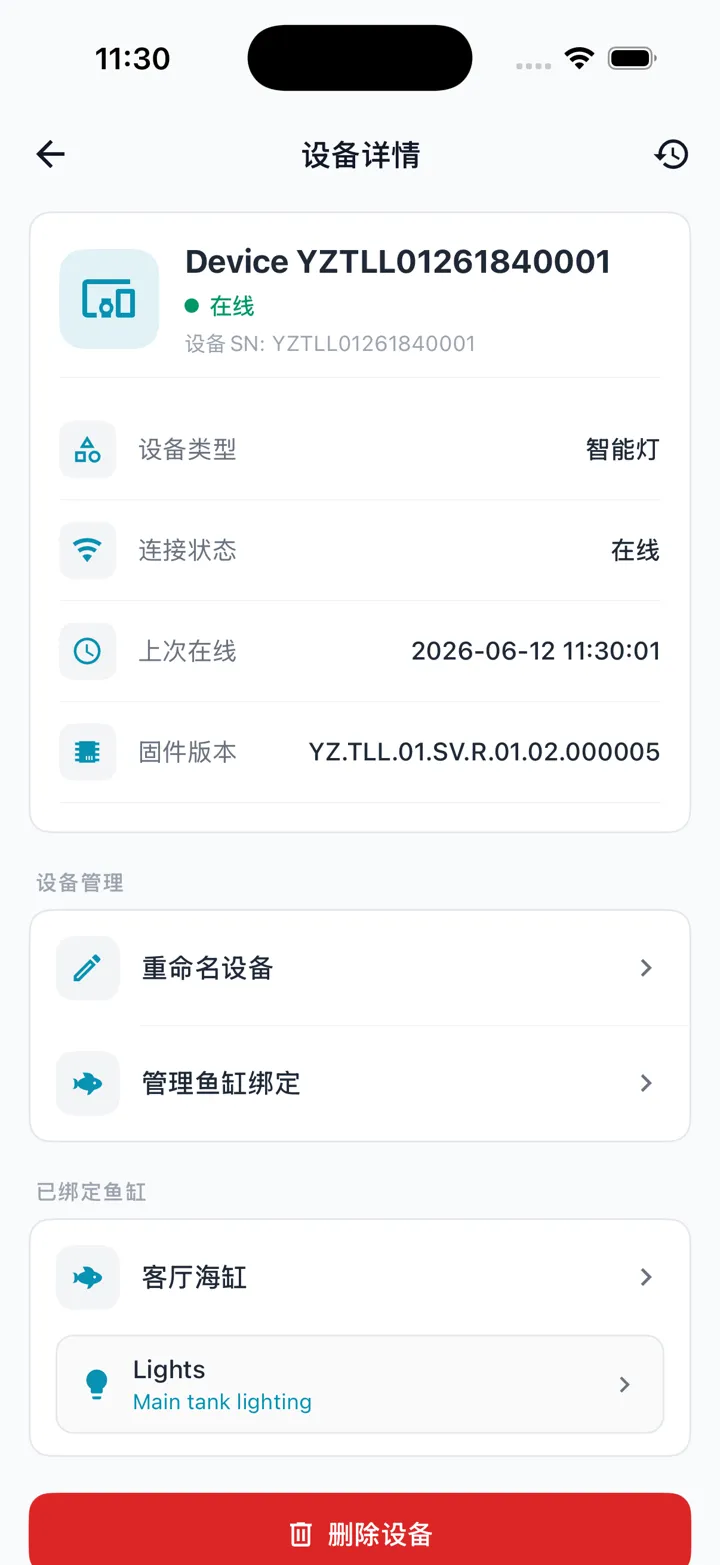
💡 One device can serve roles across multiple tanks, and you can manage which tanks it's bound to from "Device detail". It's clearest to start binding from the tank side.
Common roles include: main light, moonlight, refugium light, main pump, return pump, wavemaker, drain pump, air pump, top-off valve, dosing pump, water-temperature sensor, main/sump/overflow water-level sensors, flow meter, and the universal power strip.